What is the best kind of software? FREE SOFTWARE!
Most people don’t look into the free software that comes with their new camera, causing them to miss out on some useful functionality. I’m always excited for freebies that come with my purchase. Especially because in photography, the purchases aren’t cheap. Simply taking advantage of the free tools that come with your camera automatically add more value to your investment!
EOS Utility is only one example of free software available for Canon cameras. Others include Digital Photo Professional, Picture Style Editor, GPS Log File Utility, and don’t forget about the Canon Connect Android/iPhone app. And more recently the EOS Webcam Utility for using your DSLR as a webcam! Today we’ll be focusing on EOS Utility.
Many canon cameras are compatible with the EOS Utility software. To see if yours is, see the list of compatible cameras on Canon’s website here. This link is also the best place to download the software. (Be careful not to download EOS Utility from any domain other than canon.com). Once you click on the link above, you can select your compatible camera, and it will list out the software compatible with your camera. Hopefully, this includes Canon EOS Utility!
So what is the big deal, why should we use EOS Utility? I will admit we shouldn’t use things just because they are free, there must be some value.
MAIN FEATURES
- Image Download Capabilities
- Automatic Download
- Select & Download
- Remote Shooting
- Controls
- Quick Preview
- Live shooting
- Software Linking
The third feature of EOS utility is the ability to adjust all camera settings that are not on the quick access menu. Nothing exciting here, so we won’t be covering this today.
After you have EOS Utility installed, we will need to get connected. Afterwards we will run through these features while highlighting our favorite parts. Hopefully this will get you excited on what’s included with your EOS investment!
There are two ways you can connect your camera to your computer. If your camera is Wi-Fi enabled, you can use this option. Otherwise you can use the standard USB cable that came with your camera.
First, Disclaimer on Wi-Fi vs. USB connection.
Throughout this article we are going to discuss the various EOS utility capabilities which can be done with Wi-Fi or USB. There are differences you want to keep in mind when thinking of which way you want to connect.
Wi-Fi
Wi-Fi is terrific if you don’t want to touch any wires or memory cards. However, the connection is much slower for any type of data transfer. If you want to download photos, or do remote shooting with previews, prepare to wait longer for the transfer of images. This might be a good option if you want to download a bunch of images and are not in a rush to edit and view them. If you love being wire-free, the reduced transfer speed might be a worthy tradeoff. Being wire-free also means your camera can be on a tripod across the room or in weird positions and still be able to transfer data without an awkwardly attached cable.
The other downside with connecting via Wi-Fi is that this method requires your computer to be connected to the camera’s generated network (camera access point mode). Meaning you won’t have access to the internet while your computer is connected to the camera. There is a way to connect the camera to your home Wi-Fi network, and then EOS Utility on your computer. I don’t recommend this though, as this connection is much, much slower.
USB
A USB connection will be much faster at transferring data. Remote shooting and downloading images will be quicker to work with. This is my preferred method, just because I find transfer speed to have a big impact on my workflow, especially when remote shooting (also known as tethered shooting). Of course the con here is that you have to run an actual cable from your camera to your computer. This can be really inconvenient if you don’t have a cable long enough and adds general inconvenience. A long cable also poses a risk of tripping on your cable which can easily damage your camera!
Keep these items in mind, and you can choose the best connection option here based on your needs.
CONNECTING TO YOUR CAMERA
STEPS TO CONNECT VIA WIFI
This is on a Canon 6D Mark II, but will be very similar on other EOS cameras. This will also be using the camera access point mode.
- On your camera go to Menu>Wireless Communication Settings>Wi-Fi Settings>Wi-Fi>Enable
- Back in the Wireless Communication Settings menu, go to Wi-Fi Function, and select the computer icon: Remote Control (EOS Utility).
- Select Register a device for connection – this will generate a Wi-Fi network that your computer can connect to. Look for the SSID in your computers Wi-Fi network options. Enter the supplied password and done!
- Startup Canon EOS Utility!
STEPS TO CONNECT VIA USB CABLE
- Connect your camera via USB cable
- Done! Start Up Canon EOS Utility!
Now that you have EOS Utility installed and your camera connected we can move onto the fun stuff – features!
DOWNLOADING IMAGES
The first feature on Canon Eos utility is the ability to download your images. Doesn’t sound very exciting, does it? But this actually can make your life much easier!
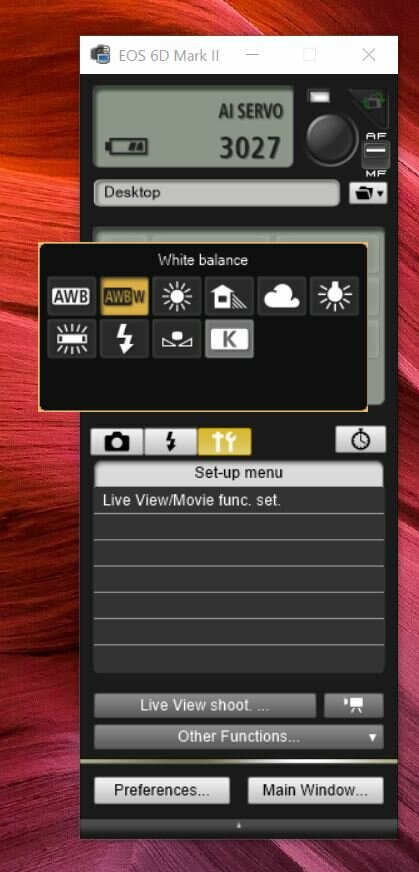
After you’ve connected, startup utility should show this screen:
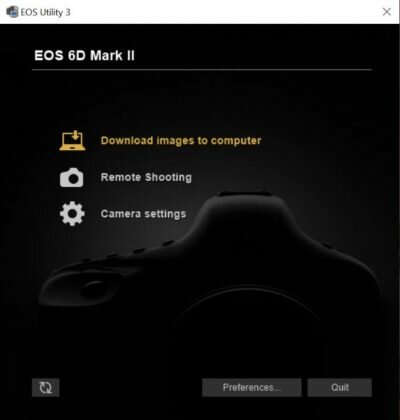
Selecting “Download images to computer” takes you to two more options. You can select “Start Automatic Download” or “Select and Download”.
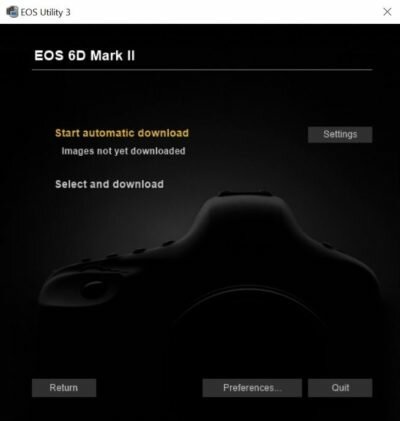
AUTOMATIC DOWNLOAD
Selecting automatic download simply starts downloading all images based on the automatic download settings. You can choose to auto download with the following preferences:
- Images not yet downloaded
- All times
- Images whose print order settings were specified with the camera
- Protected images that have not been downloaded yet
If you want to just grab everything off your camera and don’t require any filtering of photos, this is the best way to do so in the EOS Utility.
SELECT AND DOWNLOAD
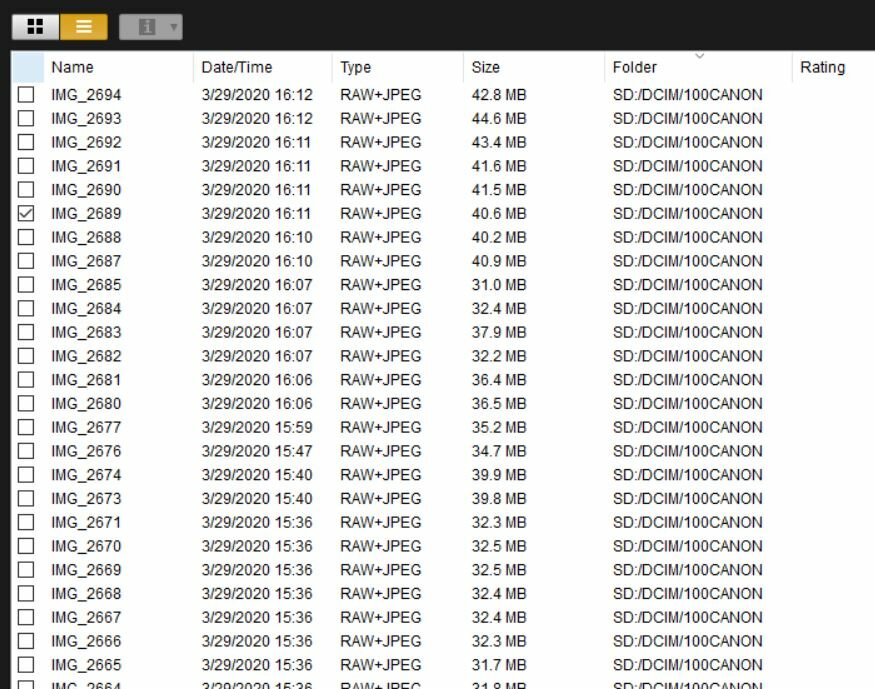
The select and download option opens up a window that displays all images in your camera. Immediately you will notice there are a bunch of options on organization and filtering.
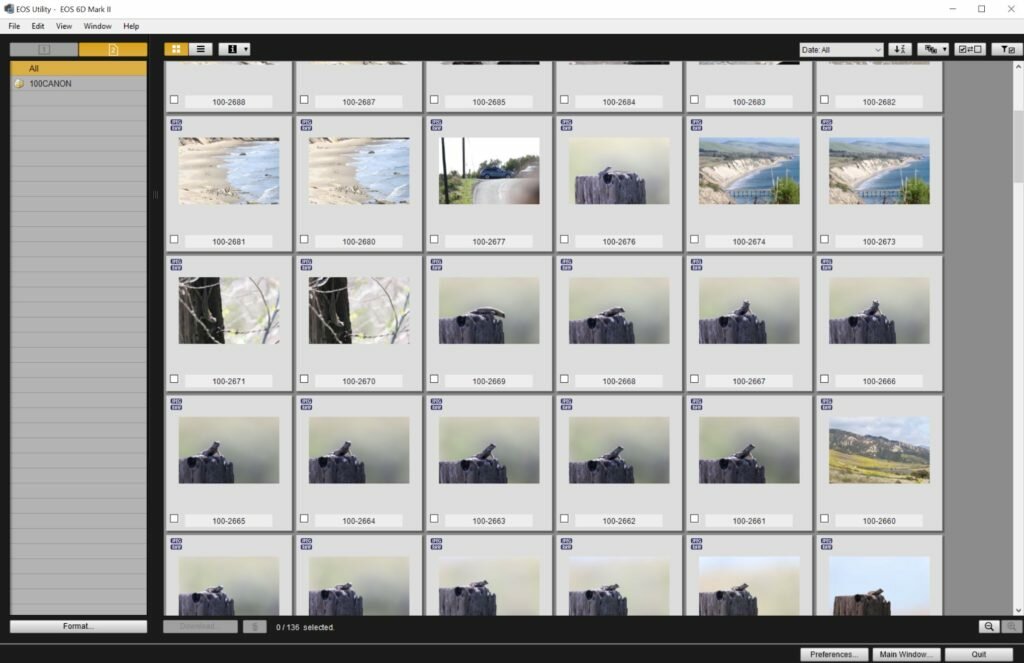
On the left side of the window we have our folders created in our memory card. If you create folders as you shoot in camera, these will all be shown here. There is also a memory card selector if you have a camera capable of holding two cards.
In the gallery area you can see your images and do a basic selection of what images you want to download. You can use the usual commands such as SHIFT + Select to grab multiple images.
Above the gallery area to the left, you can choose to display a list or the icon view. The ‘i’ icon can toggle what information is shown in the gallery on each image. This includes info such as date/time, shooting information, etc..
![]()
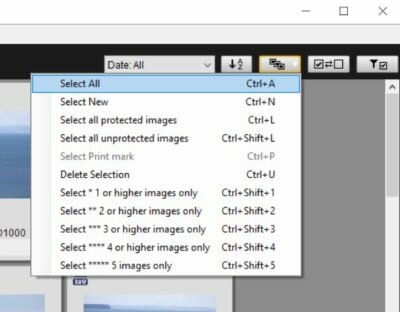 The filters on the right side are probably the most useful and flexible forms of sorting. You can select a specific date to download images from, inverse your selection, and much more! If you rate your images in camera, you can simply choose which ratings you want to download. After you’re done selecting your images, you can even filter to just show what you selected. Highly convenient!
It’s true that downloading images is something that doesn’t present many issues these days. And with the use of USB 3.0 SD card readers, most photographers simply take their SD card out to transfer images at amazingly fast speeds. Though if you do find yourself needing to only download a select set of images out of the thousands on your camera, this feature is very useful.
REMOTE SHOOTING
Now to the next main feature, remote shooting. This is easily my favorite part of EOS Utility.
WHY REMOTE SHOOTING?
Remote shooting with a computer and a USB cable is also referred to as tethered shooting. You’ll notice a lot of studio photographers shoot tethered as this allows them to review images immediately on their computers. This usually means reviewing shots on large high resolution color calibrated monitors instead of a small three inch camera display.
Want to learn more about tethered shooting? Check out our in depth articles here:
All of us photographers have taken a shot we were excited about and then were immediately disappointed after seeing it on a computer screen. Whether it be slightly out of focus, too much motion blur, or any imperfection that simply doesn’t stand out on a small screen. Tethered shooting helps photographers pay attention to all details after each shot, and really leaves no surprises for later.
Now that we know the power of tethered shooing, let’s dig deeper into how EOS Utility helps us achieve this convenience.
REMOTE SHOOTING ON EOS UTILITY
From the main menu, select remote shooting. The window below should pop up. Take a look at the diagram to see everything offered by the remote shooting window!


This is super handy because we essentially do not need to touch our camera if we don’t want to once we are in the correct shooting mode. We have everything from the shutter button to picture styles to choose from. You will also notice that you can have all images go directly to your computer. This takes out any data transfer needed after you’re done shooting, as your computer becomes the “memory card” of the camera. Forget worrying about low memory card space when remote shooting.
In the camera shooting settings window, you can simply click on the settings to adjust them.

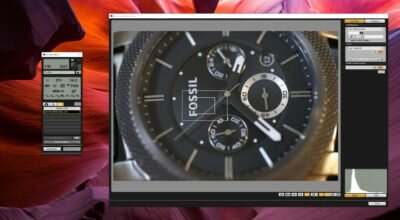
QUICK PREVIEW
Quick preview is a pop up that displays the image you just took. This is the default method of photo review when shooting tethered on this application. To enable this, click the “Other Functions” button at the bottom of the remote shooting window. Then select Quick Preview.
If you have multiple monitors, you can have the quick preview window on one monitor and have live view along with the camera controls on another monitor. With quick preview having its own monitor, you can be sure you are seeing the images in their largest format.
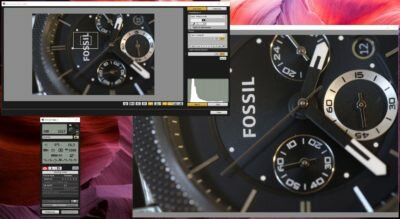
I currently have a one monitor setup with a 27″ 4K monitor, so I usually have the following layout and have no issues.
After taking a photo, it takes a few seconds for the image to be transferred to your computer and display in the Quick Preview window. With a standard quality USB cable and my Canon 6D Mark II, a Full RAW + S2 JPEG took about three seconds to download to my computer and display on my Quick Preview. I should also note that the camera was connected to my computer’s USB 3.0 port. The 6D uses a USB 2.0 port making the camera the speed limiting device. Three seconds is a tolerable delay in my opinion.
With newer USB 3.0 enabled cameras I am sure this speed is improved. If you are shooting wirelessly through Wi-Fi, the wait becomes annoyingly long. I observed a wait from 13-15 seconds after taking a photo.
LIVE VIEW SHOOTING
If you want to see live view on a larger screen instead of the camera LCD, EOS Utility gives you that option. The Live view window is pretty simple, as all our controls are still in the main settings window.
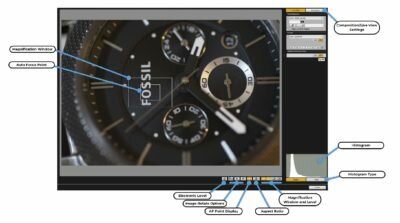
EOS Utility additionally gives us very powerful composition settings in the composition menu. We have the ability to have fully customizable gridlines. Here we can choose how many lines we want in each direction, along with specific colors and thicknesses.
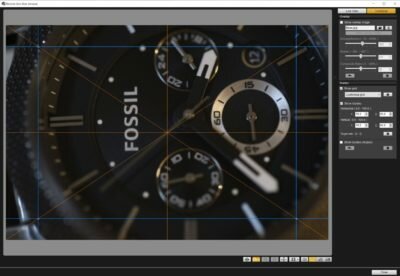
There is even an option to overlay a transparent image on top of your live view! This is terrific for trying to match a composition taken beforehand and a ton of other creative uses!
SOFTWARE LINKING
If for whatever reason you are not interested in using quick preview and you want to have images open with another software for previewing, you can!
In the Preferences, there is a tab called “Linked Software”. This is where you can have the program of your choice open up every time an image is taken. By default this is set to “None”. Keep the “None” selection if you want to continue to use Quick Preview. Otherwise, select “Register”. 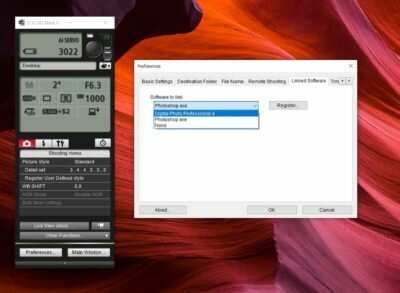
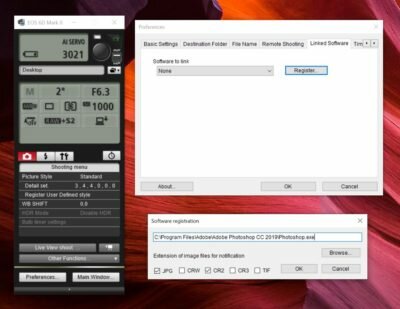
Here you can navigate to the program of your choosing and select which file types to open with that program!
All of these remote shooting features extend the operational parts of camera to our computer, and this is a useful tool when in a studio environment.
That’s a Wrap!
If you are looking for even more resources to become an EOS Utility Pro, checkout Canon’s Tutorials here.
I hope you found some value here and get some use with the software! In summary, EOS Utility provides us with a valuable tool with solutions in downloading and remote shooting. Filtering and downloading specific images is easy and can be done wirelessly if you’re not tight on time.
The remote shooting capabilities give all compatible camera users the ability to have studio level functionality and convenience. Remember EOS users, Canon provides us with these powerful tools FREE! Be sure to check out what other software is available for your camera on Canon’s website and give them a shot if you see some promise.
Happy shooting!
I finally to managed to use the wi-fi function to connect my camera to my laptop. What I had not realised, until I saw this webpage, was that it is the *camera* that generates the wi-fi connection, not the wi-fi itself being used to connect to the laptop. The problem here, for me, is that I wanted to use the camera on my telescope – which is itself controlled by the laptop, to take the images and download via wi-fi. It seems that the camera + laptop cannot communicate with the other software. May I can work out a way around this problem?
Hey Lawrence,
I believe you are able to connect your camera to your local WiFi network, this resource should provide more info on the step by step: https://th.canon/en/support/8203041400
If you are still having trouble here, I would highly recommend shooting tethered with a USB cable if your laptop is nearby. You will have a faster and more reliable connection to the EOS Utility software.
Thanks,
Dasun